Step-by-Step Guide: Building Your Own Redis Server from Scratch
Redis Revealed: The Ultimate Guide to build Redis from scratch using Node.js

4+ years of experience building scalable backend systems using Node.js, Laravel, and Go. Moving towards Solution Architecture with strong foundations in distributed systems and cloud.
Passionate about system design, databases, protocols, and high-performance services.
Laravel Stream-Pulse Laravel package for Event-Driven Architecture (EDA) using Redis Streams.
Enables scalable event publishing & consuming directly inside Laravel. Ideal for real-time apps and microservice event workflows. GoQueue Lightweight, production-ready job queue in Go with multiple backends (Redis, SQLite, SQS).
Supports retries, dead-letter queues, and graceful shutdown. Benchmarked for high-throughput event processing.
Introduction
Hi, Folks. Redis is a powerful and versatile solution in the ever-evolving landscape of data management and storage. Its lightning-fast in-memory data store capabilities, along with its support for a variety of data structures.
This article is a step-by-step guide for building your very own Redis server from the ground up, leveraging the popular JavaScript runtime environment, Node.js.
We'll walk you through the process, providing clear explanations and hands-on examples, so you can grasp the core concepts of Redis server construction. By the end of this guide, you'll not only have a semi-functional Redis server tailored to works of simple needs but also a deeper understanding of how Redis works under the hood.
Repilt for hands-on Redis Implementation.
What is Redis?
Redis, which stands for Remote Dictionary Server, is an open-source, in-memory data store and caching system. It is often referred to as a "data structure server" because it allows you to store and manipulate various data structures.
Redis is widely used in various use cases, including session management, real-time analytics, caching, leaderboard and ranking systems, message queuing, and more.
Redis offers different persistence options to ensure data durability, including snapshots and append-only files. You can choose the level of persistence that suits your use case.
it is a popular choice for developers and organizations seeking high-performance data storage and manipulation solutions.
What makes Redis Different from other solutions?
Now you may have some questions How is it different from other Databases?
Redis differs from traditional databases in several significant ways. Here are some key differences between Redis and traditional databases.
Data Model:
Redis is a key-value store, where data is stored as key-value pairs, and each value can be one of several data types, including strings, lists, sets, and hashes. Traditional databases typically use structured data models such as relational databases (SQL) with tables, rows, and columns.
In-Memory Storage:
Redis primarily stores data in memory, making it extremely fast for read and write operations. Traditional databases usually store data on disk and use memory for caching, which can result in slower data access.
Performance:
Redis is optimized for high-speed data access and is well-suited for use cases where low-latency response times are crucial. Traditional databases may have higher latency due to disk I/O and complex query processing.
Data Persistence:
Redis offers various persistence options, but it is often used as an in-memory cache with optional persistence to disk. Traditional databases typically prioritize data durability and often use complex storage mechanisms to ensure data persistence. Data Structure Support:
Redis provides native support for a variety of data structures (e.g., lists, sets, sorted sets, hashes) and offers atomic operations on these structures. Traditional databases primarily work with tabular data and require defining schemas.
Consistency and ACID Transactions:
Redis provides atomic operations but does not guarantee full ACID (Atomicity, Consistency, Isolation, Durability) compliance. Traditional databases typically offer ACID transactions and strict consistency guarantees.
Now before jumping into the coding part. Let's understand some terminologies & computer jargon's.
Understand key Terminologies
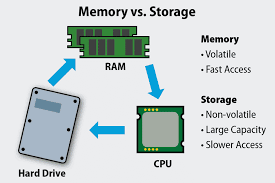
What is In-Memory Storage?
In-memory storage, also known as memory-resident storage or RAM (Random Access Memory) storage, refers to a data storage approach where data is stored and managed directly in the computer's main memory (RAM) rather than on traditional disk-based storage devices like hard drives or SSDs (Solid-State Drives).
So, In-memory means. We lost our data if a server or power went down. Just keep these ideas in mind. The term does not belong only to Redis.
What is a key-value store?
A key-value store, also known as a key-value database or simply KVS, is a type of NoSQL database that stores and retrieves data as a collection of key-value pairs.
In a key-value store, each piece of data is associated with a unique identifier called a "key," and the actual data is stored as the "value" associated with that key.
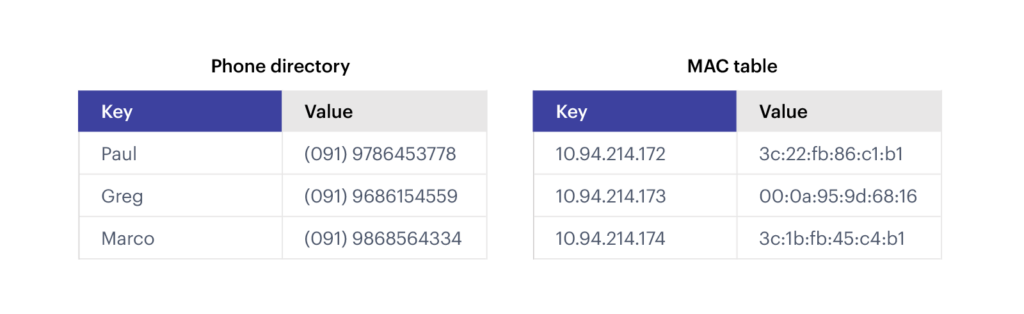
The key-value store can be implemented easily with the javascript Map data type. It simple as that.
What is a TCP Server or Connection?
A TCP (Transmission Control Protocol) server is a type of network server that uses the TCP protocol to establish and maintain connections with clients over a network. TCP is one of the core protocols of the Internet Protocol suite (TCP/IP) and is used for reliable, connection-oriented communication between devices on a network.
A TCP server is a network server that uses the TCP protocol to establish reliable connections with clients, enabling data exchange over the network.
An in-depth explanation of TCP is out of the scope of this article. Check out this article to understand more about TCP Explained.
So, if you're ready to roll up your sleeves, sharpen your Node.js skills, and embark on this exciting journey, let's get started on building your very own Redis server, brick by brick.
Steps to build
We are going to build in step-by-step implementation of each feature on it. The complete code is on this S-Redis-repo.
Creating a TCP server
Respond to PING & ECHO command
Implementing SET & GET command
Implementing Expiry
Creating a TCP server
Creating a TCP server in Node.js is relatively straightforward. You can use Node.js's built-in net module to create a TCP server.
const net = require("net");
const HOST = "127.0.0.1";
const PORT = 6378;

const server = net.createServer((connection) => {
  connection.write(`s-redis:${PORT}>`);
  // Handle connection
  connection.on("data", (data) => {

    console.log("Client connectd to s-redis");

    });

});

server.listen(PORT, HOST, () => {
  console.log(`s-redis server started on ${HOST}:${PORT}`);
});
By default, the Redis server runs on TCP Port 6379. If you may have already Redis running on that port. So we are going to use Port 6378. Now you can start the server & test does your server accepts the connection or not.
Start the server. You can see the following outputs on your terminal.

I am using a Linux-based OS. So I decided to test our Redis server with a telnet command on the terminal.
Open a new terminal & now and use the following command to test does your Redis server accepting the incoming connections.
telnet 127.0.0.1 6378
// output
Trying 127.0.0.1...
Connected to 127.0.0.1.
Escape character is '^]'.
Client connectd to s-redis
We are done with our first task. We created a TCP server & started accepting an incoming request.
Respond to PING & ECHO command
Our next step is going to be accepting input from users & responding to it. Let's make our first request & response.
It simply reads data from a buffer & responds if the string buffer has PING as a user command.
const net = require("net");
const HOST = "127.0.0.1";
const PORT = 6378;

const encodeRespString = (str) => `+${str.trim()}\r\n`;

const server = net.createServer((connection) => {
  connection.write(`s-redis:${PORT}>`);
  // Handle connection
  connection.on("data", (data) => {

  const string = dataBuffer.toString().trim();
  const respArray = string.split(" ");

   if(respArray[0]==="PING")
   return connection.write(encodeRespString("PONG"));

   if(respArray[0]==="ECHO")
   return connection.write(encodeRespString("Hello from redis"));

   connection.write(encodeRespString("Command not Found"));

    });

});

server.listen(PORT, HOST, () => {
  console.log(`s-redis server started on ${HOST}:${PORT}`);
});
Now we can get the user commands & parse them & respond to them. The real-world implementation of the parser will be a bit more complex & some validation will be there for better error handling.
Now you may have thought about how multiple connections can be handled on this server. That's where the Node Js Event loop kicks in. Because We are using the node js for building our Redis concurrency is already achieved with the help of Event Loop in it.
That's our second step completed. You can check by opening multiple terminals & connecting to your own Redis server & see it responding for multiple client connections.
Implementing SET & GET command
Our next step is going to be working on the real functional part of the Redis which is handling the SET & GET command. For simplicity am skipping the validation & type checking part. I am trying to make you understand the behind-the-scenes of the Redis server.
I have used a javascript Map data structure to implement a key-value store.
class RedisStore {
  constructor() {
    this.hashMap = new Map();
  }

  set(key, value) {
    this.hashMap.set(`${key}`, value);
  }

  get(key) {
    if (this.hashMap.has(`${key}`)) {
      return this.hashMap.get(`${key}`);
    }
    return "-1";
  }

  remove(key) {
    return this.hashMap.delete(`${key}`);
  }
}
Now we are going to parse the user commands & leverage the RedisStore class functions for storing the data in memory.
const net = require("net");
const HOST = "127.0.0.1";
const PORT = 6378;

class RedisStore {
  constructor() {
    this.hashMap = new Map();
  }

  set(key, value) {
    this.hashMap.set(`${key}`, value);
  }

  get(key) {
    if (this.hashMap.has(`${key}`)) {
      return this.hashMap.get(`${key}`);
    }
    return "-1";
  }

  remove(key) {
    return this.hashMap.delete(`${key}`);
  }
}

const store = new RedisStore();

const encodeRespString = (str) => `+${str.trim()}\r\n`;

const server = net.createServer((connection) => {
  connection.write(`s-redis:${PORT}>`);
  // Handle connection
  connection.on("data", (data) => {

  const string = dataBuffer.toString().trim();
  const respArray = string.split(" ");

   if(respArray[0]==="PING")
   return connection.write(encodeRespString("PONG"));

   if(respArray[0]==="ECHO")
   return connection.write(encodeRespString("Hello from redis"));

     if (respArray[0].toUpperCase() === "SET") {
      if (typeof respArray[1] != "string") throw new Error("Invalid KEY Type");
      if (!respArray[2]) throw new Error("value cannot be empty");

      store.set(respArray[1], respArray[2], ttl);

      return connection.write(encodeRespString("1"));
    }

    if (respArray[0].toUpperCase() === "GET") {
      if (typeof respArray[1] != "string") throw new Error("Invalid KEY Type");
      return connection.write(encodeRespString(store.get(respArray[1])));
    }

    return connection.write(encodeRespString("Not a valid command"));
  });


});

server.listen(PORT, HOST, () => {
  console.log(`s-redis server started on ${HOST}:${PORT}`);
});
Now you can send commands like SET & GET values from your redis-server. Try to run the following commands & test does your sever responding with correct values.
SET name zerocode
SET age 23
GET name
GET age
Wow, Thanks for reading this blog till this. Now you may have an idea of how the real Redis server is working under the hood. Finally, we have completed Step 4.
But,still we have to fix the last piece of the puzzle. That How to implement a expiry feature of redis-server.
Implementing Expiry
This the last step. Thats so, simple than what we done yet till. Simply add a setTimeout while adding new key into the RedisStore as like below.
 set(key, value, ttl = 0) {
    let isInserted = this.hashMap.set(`${key}`, value);

    if (isInserted && ttl) {
      setTimeout(() => {
        this.remove(key);
      }, ttl);
    }
  }
Add while parsing the user input check that user is passing a valid time for expiry & pass those to the redis store.
if (typeof Number(respArray[3]) != "number")
        throw new Error("Invalid TTL");

      let ttl = 0;
      if (respArray[3]) {
        ttl = respArray[3];
      }
      store.set(respArray[1], respArray[2], ttl);
Amazing. We have build our own redis-server implementaion with node.js. I hope the arctile added some value to your knowledge base. If you felt any improvements needed on share you thoughts & comments.
Conculsion
In this article, we've taken a hands-on journey into the world of TCP server creation using Node.js, a versatile and efficient JavaScript runtime.By building a simple redis server, we've explored the fundamental concepts and idea behind the redis.
For more contents like this please follow & share it to your friends.